
No-Bake Grinch Oreo Truffles

Festive no-bake truffles using red velvet Oreos, cream cheese, and green candy coating—quick, playful, and perfect for holiday treats or party platters.

Why You'll Love This Recipe
- Ready in about 30 minutes active time with an additional 30 minutes chilling; perfect for last-minute holiday trays or quick party snacks.
- Uses pantry-friendly staples: a single package of red velvet sandwich cookies, cream cheese, and candy melts—easy to source year-round.
- No oven needed: fully no-bake, so great for hot kitchens, dorm rooms, or when you don’t want to turn on the oven.
- Adaptable and forgiving: if your dough is too soft, a short chill fixes everything; if the candy coating is too thick, a teaspoon of neutral oil thins it out.
- Crowd-pleasing and visually striking: bright green coating with a tiny red heart makes them perfect for holiday cookie exchanges, classroom parties, or dessert platters.
When I made these for a small holiday potluck, they disappeared within minutes. Friends loved the playful colors and simple flavors, and I appreciated how easy they were to transport. They travel well in a shallow box layered with parchment.
Ingredients
- Red velvet sandwich cookies: One 22-cookie package — look for fresh cookies with the red hue intact; the subtle cocoa in the cookie adds depth and a beautiful red crumb. I often use a familiar brand available in most supermarkets.
- Cream cheese: 4 ounces (room temperature) — full-fat cream cheese gives the best texture and flavor; let it soften to room temperature so it blends smoothly without clumps.
- Green candy melts: 7 ounces — pick a brand meant for dipping; if the melts are too thick, a small amount of neutral-flavored oil (coconut oil or vegetable oil) will thin them to a shiny, smooth coating.
- Red heart sprinkles: A small jar — these tiny decorations finish each piece and create the Grinch-heart motif; choose nonpareil hearts that are light enough to adhere to the coating without sinking.
Instructions
Prepare the tray and equipment: Line a large baking sheet with parchment or a silicone mat and set aside. Use a food processor for even crumbs and a microwave-safe bowl for melting the candy. Have a tablespoon measure and a dipping fork or two ready so the process is streamlined. Pulse the cookies: Place the 22 red velvet cookies in the bowl of a food processor and pulse until you have fine crumbs. Scrape the bowl down if needed to ensure there are no larger chunks — uniform crumbs produce a smoother center. Mix in the cream cheese: Add 4 ounces of room-temperature cream cheese to the crumbs and pulse until the mixture comes together into a soft, pliable dough. If the mixture sticks to your fingers, a brief scrape and an extra pulse will help; avoid overmixing which can warm the dough too much. Form the truffles: Using a 1 tablespoon measuring spoon, scoop dough and roll between your palms into tight balls. Place each ball on the prepared sheet, spacing them an inch apart. You should end up with about 11 truffles. Freeze the sheet for 30 minutes so the centers firm up for dipping. Melt the candy coating: Put the 7 ounces of green candy melts in a microwave-safe bowl and heat in 30-second bursts, stirring between each, until smooth. If the melts are too thick for dipping, stir in 1/2 teaspoon of coconut oil or any neutral, flavorless oil to reach a glossy, pourable consistency. Dip and decorate: Using a dipping fork, submerge each chilled truffle into the green coating, tapping the fork gently on the bowl to let excess drip off. Return coated truffles to the lined sheet. Transfer any remaining coating to a small piping bag and drizzle over the set truffles, then place a red heart sprinkle on top of each while the drizzle is still tacky. Set and serve: Chill the finished truffles in the refrigerator until the coating is fully set, about 10 minutes. Store in an airtight container in the fridge and serve chilled or at cool room temperature.
You Must Know
- These bites freeze well for up to 3 months when placed in a single layer on a baking sheet then transferred to a freezer-safe container, which makes them excellent for make-ahead holidays.
- They are relatively high in sugar and fat due to cream cheese and candy coating — enjoy in moderation and store chilled to maintain shape and texture.
- Keep them refrigerated if your kitchen is above 70°F; the candy shell can soften in warm conditions.
- Adjust the oil in the candy melts a teaspoon at a time; too much oil thins the shell and reduces the characteristic snap.
My absolute favorite part is how easily these spark joy at a gathering. One winter I packaged small stacks in cello bags and handed them out as simple hostess gifts—everyone loved the color and crunch. They’re also forgiving: if a truffle cracks during dipping, recoat or press a small sprinkle over the spot and the flaw disappears.

Storage Tips
Store the truffles in an airtight container lined with parchment. If stacking, separate layers with additional parchment to prevent sticking. Refrigerate for up to 1 week; for longer storage, freeze on a sheet pan until solid, then transfer to freezer-safe airtight containers for up to 3 months. To thaw, move frozen truffles to the refrigerator for several hours or overnight — avoid room-temperature thawing which can cause condensation on the candy shell and dull the finish. When transporting, keep them cool in an insulated bag with a small ice pack.
Ingredient Substitutions
If you can’t find red velvet cookies, use regular chocolate sandwich cookies for a classic Oreo truffle, then dye white candy coating green. For a dairy-free option, swap in vegan cream cheese and choose dairy-free candy melts. To reduce sweetness, use dark chocolate melts tinted with oil-friendly green coloring instead of candy melts. If you need gluten-free, select certified gluten-free sandwich cookies — note the texture and flavor will differ slightly depending on the cookie base.
Serving Suggestions
Arrange truffles on a festive platter with contrasting colors — place on a bed of fresh holly (non-edible decorative) or alongside small mint leaves for a seasonal palette. Pair with hot cocoa, coffee, or a glass of cold milk for balance. For a party, present them in mini muffin liners or on tiered dessert stands to create height. These are perfect as after-dinner sweets, small favors, or part of a holiday cookie box.
Cultural Background
Sandwich-cookie-based confections are a relatively recent addition to home baking, rising in popularity with the proliferation of single-serve cookies. Using crushed sandwich cookies blended with cream cheese to form a no-bake confection draws from classic American dessert innovation — it's a playful reinterpretation of truffles using store-bought components. The Grinch motif borrows from contemporary holiday pop culture rather than a traditional recipe, turning nostalgic flavors into a whimsical holiday presentation.
Seasonal Adaptations
Adapt the colors and decorations for other holidays: use pastel melts and egg-shaped sprinkles for spring, orange coating with black sprinkles for Halloween, or gold-dusted white coating for New Year’s. Swap heart sprinkles for snowflakes or stars, and use flavored cream cheese (a touch of vanilla or orange zest) to complement different seasons. For summer parties, reduce refrigeration time and serve chilled to refresh guests on a warm day.
Meal Prep Tips
Make the crumb-and-cream mixture up to two days ahead and keep it refrigerated in an airtight container. Shape the balls shortly before guests arrive and freeze for 30 minutes to set — this quick chill streamlines the dipping process. If preparing dozens, melt candy melts in small batches to maintain optimal dipping temperature and viscosity. Keep extra parchment and piping bags on hand to speed up decoration and cleanup.
These little Grinch-inspired delights are a joyful reminder that festive food can be simple, colorful, and made with things you likely already have on the shelf. Make them your own with different cookie bases, coatings, and sprinkles — I hope they bring a smile to your table as they have to mine.
Pro Tips
Soften the cream cheese to room temperature for a smooth, lump-free center.
If the candy melts are too thick for dipping, stir in 1/2 teaspoon of neutral oil and test consistency before adding more.
Freeze the formed balls for at least 30 minutes so they retain their shape when dipping.
This nourishing no-bake grinch oreo truffles recipe is sure to be a staple in your kitchen. Enjoy every moist, high protein slice — it is perfect for breakfast or as a wholesome snack any time.
Tags
No-Bake Grinch Oreo Truffles
This No-Bake Grinch Oreo Truffles recipe makes perfectly juicy, tender, and flavorful steak every time! Serve with potatoes and a side salad for an unforgettable dinner in under 30 minutes.
Instructions
Prepare equipment and workspace
Line a baking sheet with parchment and gather a food processor, measuring spoon, dipping fork, and a microwave-safe bowl.
Pulse cookies to crumbs
Place the 22 red velvet cookies in the food processor and pulse until you have fine, even crumbs. Scrape down the bowl as needed for consistency.
Blend with cream cheese
Add 4 ounces of room-temperature cream cheese to the crumbs and pulse until a soft dough forms, with no visible lumps.
Form truffle balls
Use a 1 tablespoon measure to scoop dough, roll into tight balls between your palms, and arrange on the lined baking sheet. Freeze for 30 minutes to firm up.
Melt candy coating
Melt 7 ounces of green candy melts in 30-second increments in the microwave, stirring between each interval. Thin with 1/2 teaspoon neutral oil if needed.
Dip and decorate
Dip chilled balls into the melted coating using a dipping fork, let excess drip off, return to the sheet, drizzle leftover coating, and top each with a red heart sprinkle.
Chill and serve
Refrigerate until the coating is fully set, about 10 minutes. Store in an airtight container in the fridge for up to one week, or freeze for longer storage.
Last Step: Please leave a rating and comment letting us know how you liked this recipe! This helps our business to thrive and continue providing free, high-quality recipes for you.
Nutrition
Did You Make This?
Leave a comment & rating below or tag
@feedcooks on social media!
Categories:
You might also like...
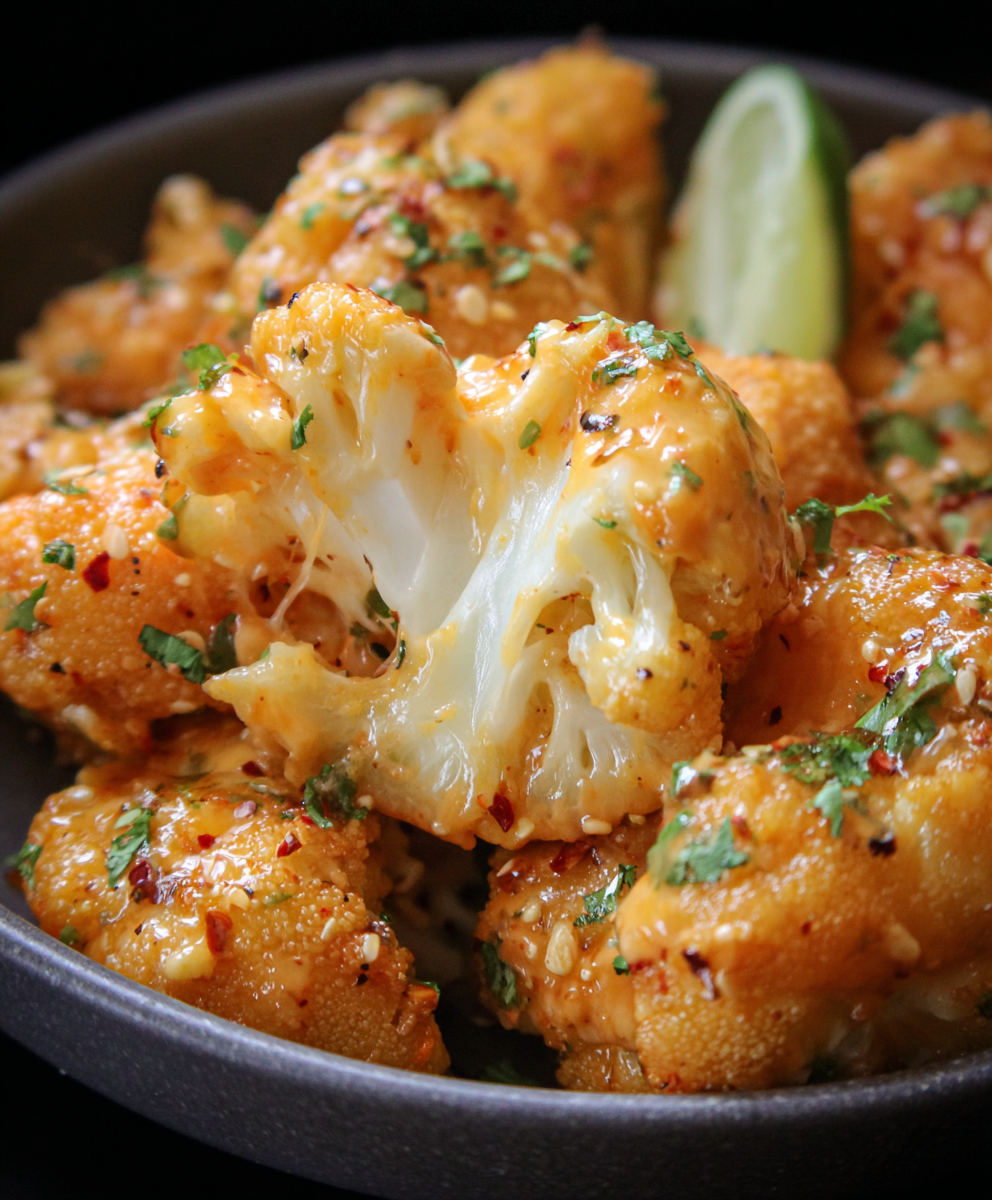
Air Fryer Bang Bang Cauliflower
Crispy air-fried cauliflower tossed in a creamy, sweet-spicy bang bang sauce. A crowd-pleasing appetizer or vegetarian main that's quick, crunchy, and addictive.

Air Fryer Buffalo Cauliflower
Crispy, tangy buffalo cauliflower made in the air fryer for a fast, crowd-pleasing appetizer or snack ready in under 30 minutes.

Air Fryer Honey Butter Garlic Chicken
Crispy air-fried chicken pieces tossed in a glossy honey-butter garlic glaze — a 20-minute weeknight favorite that's sweet, savory, and irresistibly sticky.
Did You Make This?
Leave a comment & rating below or tag @feedcooks on social media!
Rate This Recipe
Share This Recipe
Enjoyed this recipe? Share it with friends and family, and don't forget to leave a review!
Comments (1)
This recipe looks amazing! Can't wait to try it.
Comments are stored locally in your browser. Server comments are displayed alongside your local comments.
Hi, I'm Lena!
What's Popular
Get My 30-Minute Meals email series!
Quick and easy dinner ideas delivered to your inbox.