
Beef & Kimchi Melt Sandwich

A savory, tangy sandwich combining thinly sliced beef, melty cheese, and spicy-sour kimchi for a quick, crowd-pleasing meal.
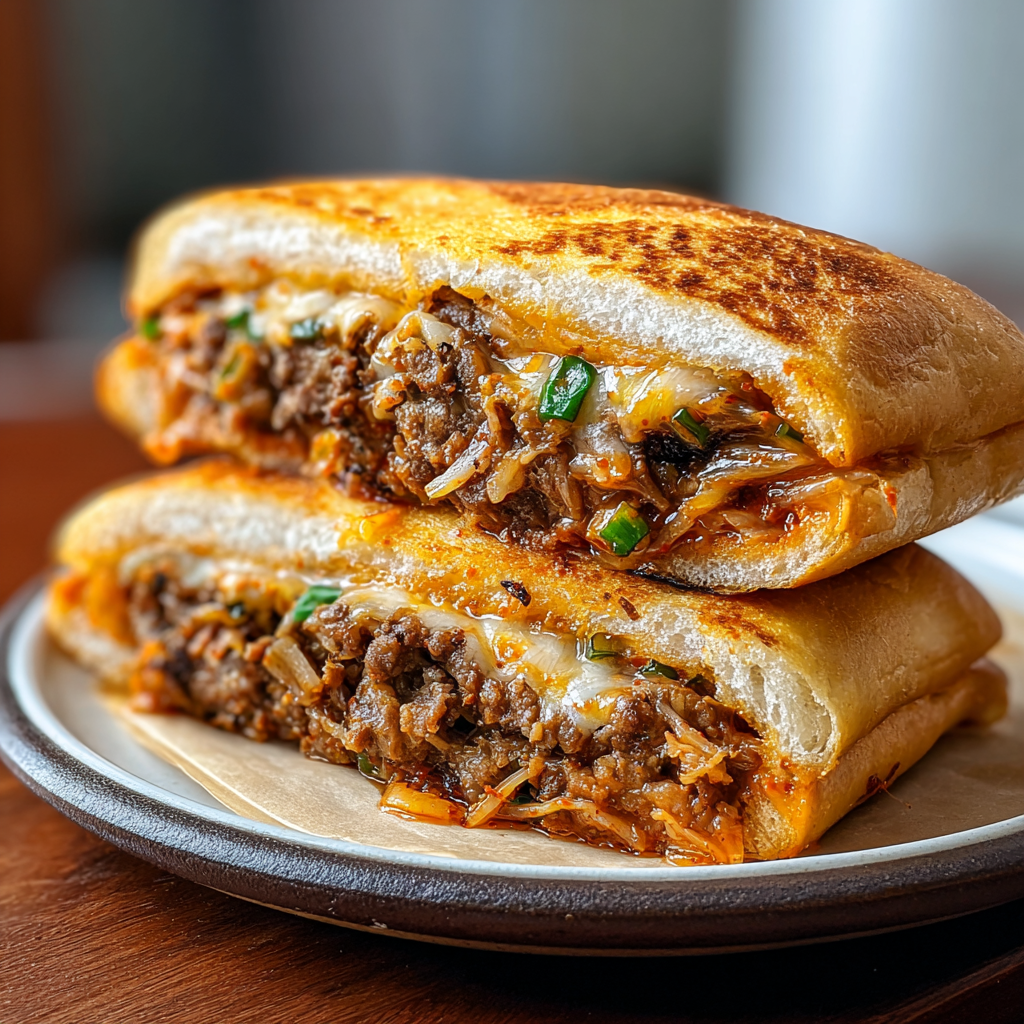
This sandwich became my go-to answer to a weeknight question: "What’s for dinner?" I discovered the combination during a busy autumn when I had leftover thinly sliced beef from a stir-fry and a jar of lively kimchi in the fridge. The contrast of warm, savory beef, gooey melted cheese and bright, crunchy kimchi felt new and utterly comforting. It’s the sort of sandwich that manages to be both familiar and a little wild — the cheese tames the kimchi just enough while the sesame-scented beef gives the whole thing a savory backbone.
Every time I make this, the aroma of caramelized onions and toasted bread brings everyone to the kitchen. I usually slice the beef thinly (about 1/8 inch) so it reheats quickly and layers beautifully on the bread; if you buy pre-sliced sirloin or ask your butcher to slice it for you, that’s an easy time saver. This recipe is quick to adapt: switch the cheese, add a swipe of mayonnaise, or bulk it up with extra peppers. The first time my family tasted it, my teenager declared it a "restaurant sandwich," which is the highest praise in our house.
Why You'll Love This Recipe
- Quick to prepare: from chopping to sandwich on the table in about 25 minutes, perfect for weeknights when time is short.
- Uses pantry and fridge staples: thin beef, kimchi, onion, and a couple of cheeses make flavorful meals without a long shopping list.
- Texture play: crunchy kimchi and peppers contrast with tender, seared beef and gooey melted cheese for a satisfying bite.
- Make-ahead friendly: you can marinate the beef and chop vegetables up to a day ahead, then finish assembly when you’re ready.
- Crowd-pleaser: easily scaled to feed 2–6, and picky eaters can customize with or without kimchi or extra cheese.
Personally, I love that this sandwich bridges comfort and curiosity — it’s familiar enough for kids if you dial back the kimchi, yet exciting for adults when you add a little extra heat. The balance of savory, sour, and creamy keeps everyone asking for a second round.
Ingredients
- Beef sirloin (1 lb): Choose thinly sliced sirloin or ask your butcher to slice it paper-thin (about 1/8 inch). Sirloin has good beefy flavor and sears quickly without getting tough.
- Kimchi (1 cup): Well-fermented, crunchy kimchi adds acidity and spice. Use a classic napa cabbage kimchi; look for brands like Mother-in-Law or local Korean markets for a lively flavor.
- Yellow onion (1 medium): Sliced into 1/8–1/4 inch strips to caramelize and sweeten, which balances kimchi’s heat.
- Bell peppers (1 cup): Any color sliced thin; they add sweetness and crunch. Use a mix of red and orange for color if possible.
- Cheese (4 slices): Provolone or American provide good melt and a mild flavor that softens kimchi’s bite. Swiss or cheddar also work if you prefer sharper flavors.
- Low-sodium soy sauce (2 tbsp): Adds savory umami to the beef without overwhelming saltiness. Low-sodium brands keep the balance friendly with kimchi.
- Sesame oil (1 tbsp): A small amount offers sesame aroma — a little goes a long way.
- Vegetable oil (2 tsp): For high-heat searing; neutral-flavored oils like canola or grapeseed work well.
- Optional: 1 clove minced garlic and 1/2 tsp sugar for the marinade to round flavors and add caramelization.
Instructions
Prepare the Beef: Combine 1 lb thinly sliced beef with 2 tbsp low-sodium soy sauce, 1 tbsp sesame oil, and optional 1 clove minced garlic and 1/2 tsp sugar. Toss to coat and let sit 10–15 minutes at room temperature. Marinating briefly tenderizes the surface and infuses savory notes without overwhelming the beef. Prep Vegetables: While the beef marinates, slice 1 medium yellow onion and 1 cup bell peppers into thin strips. Drain or lightly squeeze kimchi to remove excess liquid if it’s very wet — you want kimchi to contribute flavor, not make the sandwich soggy. Sear Onions and Peppers: In a large skillet over medium-high heat add 1 tsp vegetable oil. Add onions and peppers, season with a pinch of salt, and cook 5–7 minutes until softened and edges caramelize. Transfer to a bowl and keep warm. The goal is sweet, slightly browned vegetables that play against the kimchi’s tang. Cook the Beef: Wipe the skillet clean, add the remaining 1 tsp vegetable oil and heat until shimmering. Working in a single layer, add beef and sear quickly on high heat for 1–2 minutes per side, depending on thickness. Avoid overcrowding; quick sears keep slices tender. Remove when just cooked through — overcooking will dry the meat. Assemble and Melt: Return the onions and peppers to the skillet with the beef, toss to combine. Lay 4 slices of bread or rolls (not listed — use your favorite) on a work surface, pile beef and vegetables, add 1 cup chopped kimchi evenly, and top with a slice of provolone or American cheese. Toast in a panini press or return to skillet, cover with a lid, and cook until cheese melts and bread is golden, about 2–3 minutes. Finish and Serve: Let sandwiches rest 1 minute to avoid hot filling run-off, slice in half, and serve with a simple side salad or fries. A squeeze of lime or a drizzle of sesame oil over the kimchi brightens the bite.
You Must Know
- The sandwich holds well for up to 24 hours refrigerated; separate any wet kimchi if you plan to store assembled sandwiches to prevent sogginess.
- High in protein thanks to the beef (about 35–45 g per serving depending on slice thickness) and moderate in carbs from bread and kimchi.
- Freezes best as filling only: store cooked beef and vegetables in an airtight container for up to 3 months; thaw overnight in the refrigerator and reheat before assembling.
- To reduce sodium, rinse kimchi briefly and use low-sodium soy sauce; flavor will be milder but still satisfying.
What I love most about this sandwich is the joyful contrast it creates at the table — the crunchy, fermented kimchi wakes up each bite while the melted cheese soothes it into something everyone can enjoy. Friends have requested this for casual dinners and game nights because it’s both bold and approachable.
Storage Tips
Store leftover components separately for best texture: place cooked beef and sautéed vegetables in an airtight container in the refrigerator for up to 3 days. Keep chopped kimchi in its jar or a sealed container; it continues to ferment slowly, so expect stronger flavor over time. If you have assembled sandwiches, wrap tightly in plastic wrap and use within 24 hours to avoid soggy bread. To reheat, unwrap and toast in a skillet or oven at 350°F until heated through and cheese has remelted, about 8–10 minutes.
Ingredient Substitutions
Short on sirloin? Flank steak or skirt steak thinly sliced works well; cook slightly longer if slices are thicker. For a dairy-free option, substitute dairy-free melting slices or omit cheese and add a creamy avocado spread. If you need gluten-free, use a certified gluten-free soy sauce substitute (tamari) and gluten-free bread. Want more heat? Mix a little gochujang or sriracha into the beef marinade instead of sugar for deeper fermented spice.
Serving Suggestions
Serve these sandwiches with a crisp green salad dressed with rice vinegar and sesame oil to echo the flavors in the filling. Sweet potato fries or simple oven-roasted potatoes make hearty companions. Garnish sandwiches with thinly sliced cucumber for a refreshing crunch, or a sprinkle of toasted sesame seeds for aroma. For sharing, cut sandwiches into thirds and serve on a platter with extra kimchi on the side.
Cultural Background
This sandwich is a fusion of Korean and Western flavors: kimchi, Korea’s iconic fermented vegetable relish, brings bright acidity and spiciness, while the concept of a hot melt with cheese is rooted in Western comfort food. Fusion sandwiches like this have become popular in many urban food scenes where chefs pair traditional fermented elements with classic sandwich techniques to create something familiar yet novel.
Seasonal Adaptations
In winter, swap bell peppers for roasted shishito or poblano for a smoky note and add sautéed mushrooms for extra umami. In summer, use heirloom tomatoes and fresh basil alongside the kimchi for a fresher profile. For holiday gatherings, bulk up the filling with thinly sliced roasted root vegetables and a smear of cranberry-jalapeño jam to make a festive mash-up.
Meal Prep Tips
To streamline weeknight assembly, slice beef and marinate in the morning or the night before. Pre-sauté onions and peppers and store them in a shallow airtight container so they reheat quickly. Portion kimchi into small containers for grab-and-go assembly. When ready to eat, reheat beef and vegetables together, place on bread with kimchi and cheese, and grill for two to three minutes until cheese melts. This keeps active time under 10 minutes when serving.
Making this sandwich has become a ritual in my kitchen — simple ingredients transformed by technique and a little patience. I hope you enjoy the way the bold kimchi and melty cheese play together as much as we do. Try it, tweak it, and make it your own.
Pro Tips
Pat beef slices dry before marinating so they sear rather than steam.
Don’t overcrowd the pan when searing beef — work in batches for best caramelization.
Squeeze excess liquid from kimchi if it seems very wet to prevent a soggy sandwich.
Let assembled sandwiches rest 1 minute after toasting so fillings set and won’t spill.
Use a combination of provolone and American for the best melt and balanced flavor.
This nourishing beef & kimchi melt sandwich recipe is sure to be a staple in your kitchen. Enjoy every moist, high protein slice — it is perfect for breakfast or as a wholesome snack any time.
FAQs about Recipes
How long will leftovers keep?
Yes. Store cooked beef and vegetables in an airtight container in the refrigerator for up to 3 days. Keep kimchi separate to avoid soggy bread.
Can I make this lower in sodium or dairy-free?
Rinse kimchi briefly to lower saltiness and use low-sodium soy sauce. For dairy-free, use vegan melting slices or avocado.
Tags
Beef & Kimchi Melt Sandwich
This Beef & Kimchi Melt Sandwich recipe makes perfectly juicy, tender, and flavorful steak every time! Serve with potatoes and a side salad for an unforgettable dinner in under 30 minutes.
Ingredients
Main
Seasoning & Oils
Instructions
Marinate the beef
Toss 1 lb thinly sliced beef with 2 tbsp low-sodium soy sauce, 1 tbsp sesame oil, optional minced garlic and 1/2 tsp sugar. Let sit 10–15 minutes at room temperature to tenderize and infuse flavor.
Prep vegetables
Slice 1 medium yellow onion and 1 cup bell peppers into thin strips. Chop 1 cup kimchi and drain any excess liquid to prevent sogginess in the sandwich.
Sear onions and peppers
Heat 1 tsp vegetable oil in a skillet over medium-high heat. Cook onions and peppers until softened and slightly caramelized, about 5–7 minutes. Remove and keep warm.
Cook the beef
Wipe the skillet clean, add remaining 1 tsp oil and heat until shimmering. Sear beef in a single layer for 1–2 minutes per side until just cooked through, avoiding overcrowding. Remove from heat.
Assemble and melt
Return vegetables to the pan with beef, toss to combine. Build sandwiches on bread with beef, vegetables, 1 cup kimchi, and top with cheese. Toast in a panini press or skillet, cover until cheese melts, about 2–3 minutes.
Rest and serve
Let sandwiches rest 1 minute, slice, and serve with a simple salad or fries. Optionally garnish with toasted sesame seeds or a squeeze of lime.
Last Step: Please leave a rating and comment letting us know how you liked this recipe! This helps our business to thrive and continue providing free, high-quality recipes for you.
Nutrition
Did You Make This?
Leave a comment & rating below or tag
@feedcooks on social media!
Categories:
You might also like...
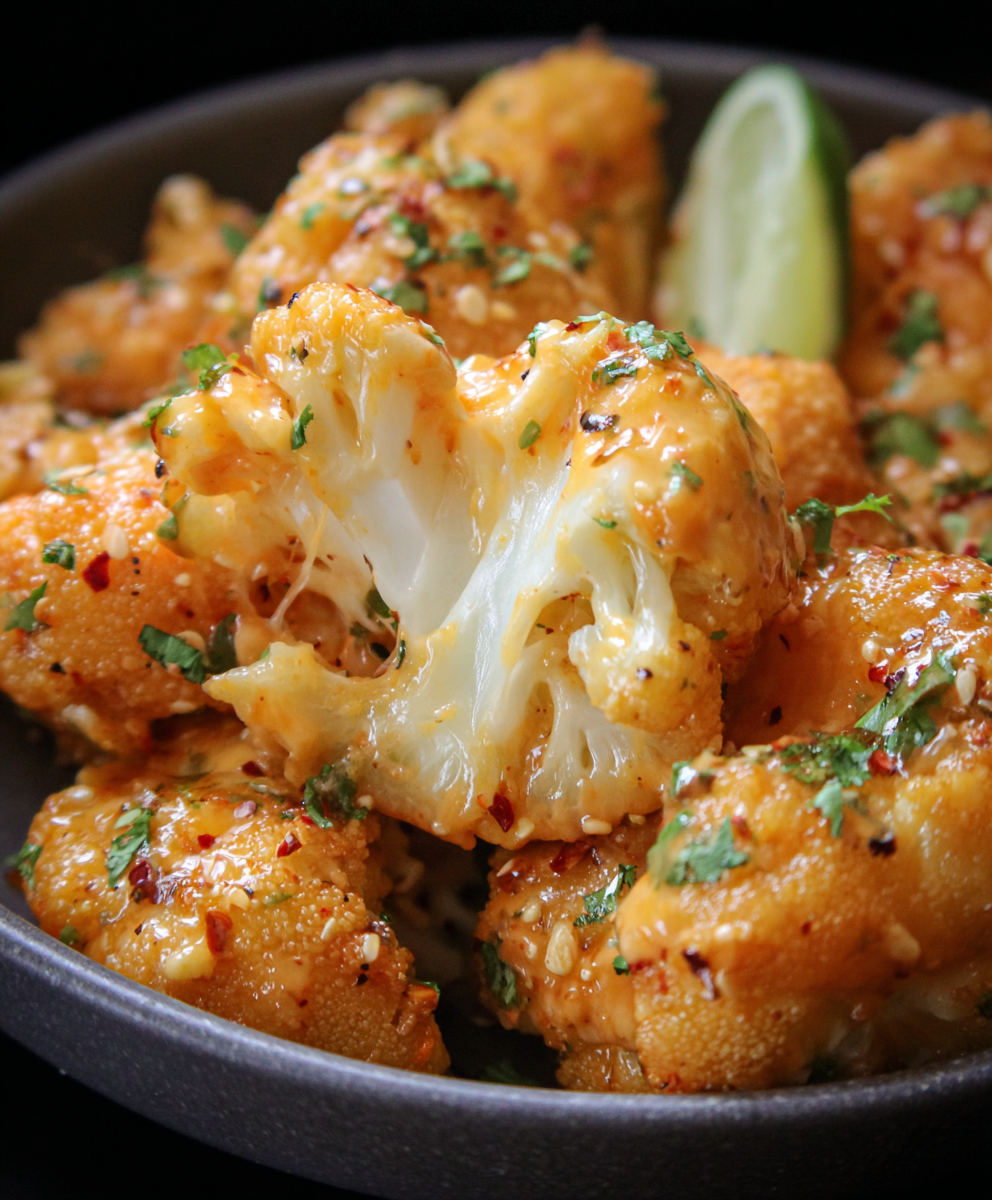
Air Fryer Bang Bang Cauliflower
Crispy air-fried cauliflower tossed in a creamy, sweet-spicy bang bang sauce. A crowd-pleasing appetizer or vegetarian main that's quick, crunchy, and addictive.

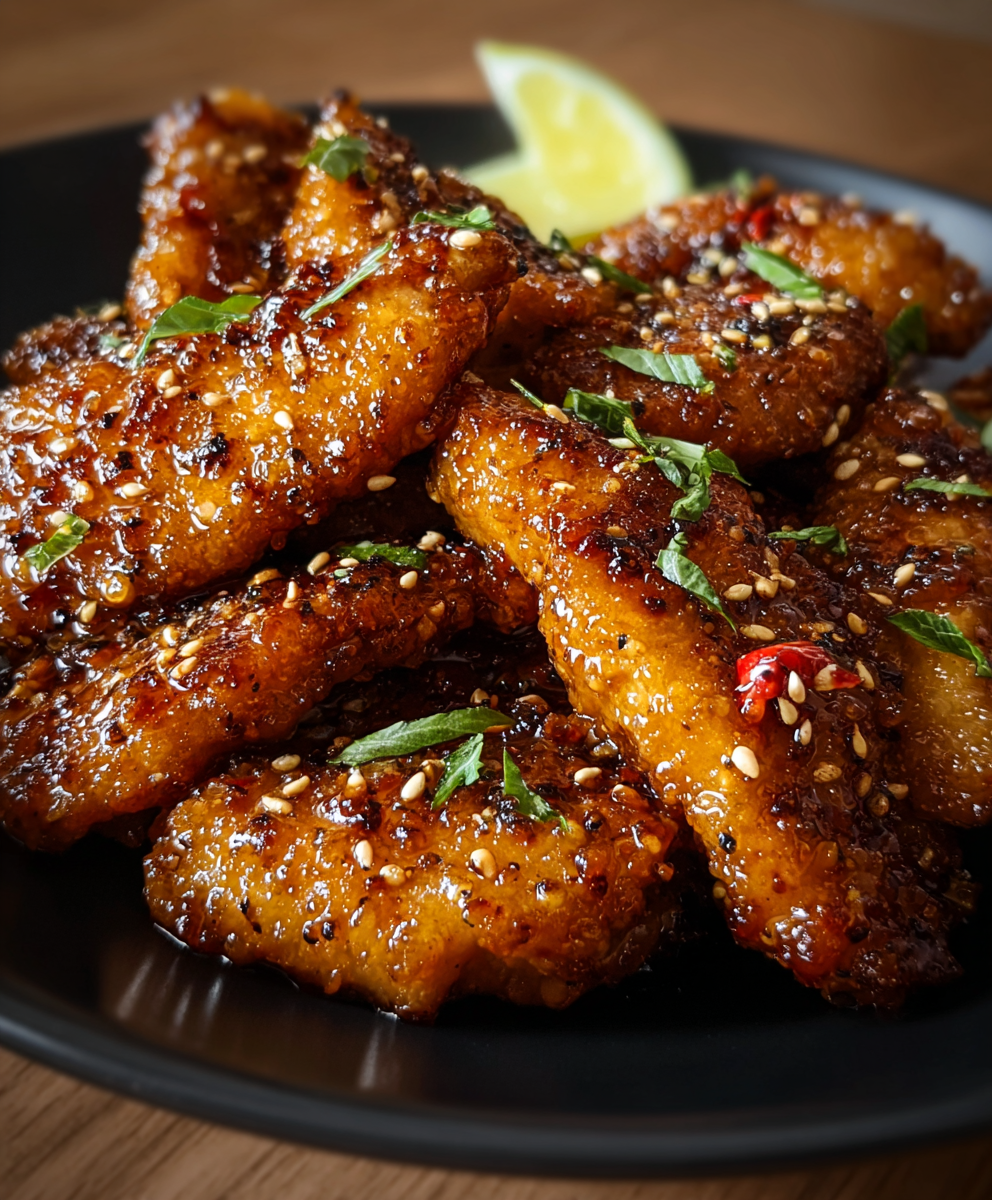
Air Fryer Buffalo Cauliflower
Crispy, tangy buffalo cauliflower made in the air fryer for a fast, crowd-pleasing appetizer or snack ready in under 30 minutes.
Air Fryer Honey Butter Garlic Chicken
Crispy air-fried chicken pieces tossed in a glossy honey-butter garlic glaze — a 20-minute weeknight favorite that's sweet, savory, and irresistibly sticky.
Did You Make This?
Leave a comment & rating below or tag @feedcooks on social media!
Rate This Recipe
Share This Recipe
Enjoyed this recipe? Share it with friends and family, and don't forget to leave a review!
Comments (1)
This recipe looks amazing! Can't wait to try it.
Comments are stored locally in your browser. Server comments are displayed alongside your local comments.
Hi, I'm Lena!
What's Popular
Get My 30-Minute Meals email series!
Quick and easy dinner ideas delivered to your inbox.